Chapter 4. Windows NT Domains
In previous
chapters, we've focused on workgroup networking to
keep things simple and introduce you to networking with Samba in the
most painless manner we could find. However, workgroup computing has
its drawbacks, and for many computing environments, the greater
security and single logon of the Windows NT domain make it worthwhile
to spend the extra effort to implement a domain.
In addition to the domain features of
that we discussed in Chapter 1, having a domain makes it possible to use
logon scripts and roaming profiles
(also called roving
profiles). A logon
script is a text file of commands that are run during startup, and a
profile is a collection of information regarding the desktop
environment, including the contents of the Start menu, icons that
appear on the desktop, and other characteristics about the GUI
environment that users are allowed to customize. A roaming profile
can follow its owner from computer to computer, allowing her to have
the same familiar interface appear wherever she logs on.
A Windows NT domain offers centralized control over the network.
Policies can be set up by an administrator to
define aspects of the users' environment and limit
the amount of control they have over the network and their computers.
It is also possible for administrators to perform remote
administration of the domain controllers from any Windows NT/2000/XP
workstation.
Samba 2.2 has the ability to act as a primary domain controller,
supporting domain logons from Windows 95/98/Me/NT/2000/XP computers
and allowing Windows NT/2000/XP[1] systems to join the domain as domain
member servers. Samba can also join a domain as a member server,
allowing the primary domain controller to be a Windows NT/2000 system
or another Samba server.
TIP
Samba 2.2 does not support LDAP and Kerberos authentication of Active
Directory, so it cannot act as a Windows 2000 Active Directory domain
controller. However, Samba can be added to an Active Directory domain
as a member server, with the Windows 2000 domain controllers running
in either mixed or native mode. The Windows 2000 server (even if it
is running in native mode) supports the Samba server by acting as a
PDC emulator, using the Windows NT
style of authentication rather than the Kerberos style.
If you're adding a Samba server to a network that
has already been set up, you won't have to decide
whether to use a workgroup or a domain; you will simply have to be
compatible with what's already in place. If you do
have a choice, we suggest you evaluate both workgroup and domain
computing carefully before rolling out a big installation. You will
have a lot of work to do if you later need to convert one to the
other. One last thought on this matter is that Microsoft is
developing Windows in the direction of increased use of domains and
is intending that eventually Windows networks be composed solely of
Active Directory domains. If you implement a Windows NT domain now,
you'll be in a better position to transition to
Active Directory later, after Samba has better support for it.
In this chapter, we cover various topics directly related to using
Samba in a Windows NT domain, including:
-
Configuring and using Samba as the primary domain controller
-
Setting up Windows 95/98/Me systems to log on to the domain
-
Implementing user-level security on Windows 95/98/Me
-
Adding Windows NT/2000/XP systems to the domain
-
Configuring logon scripts, roaming profiles, and system policies
-
Adding a Samba server to a domain as a member server
Samba as the Primary Domain Controller
Samba 2.2
is able to handle the most desired functions of a primary domain
controller in a Windows NT domain, handling domain logons and
authentication for accessing shared resources, as well as supporting
logon scripts, roaming profiles, and system policies.
TIP
You will need to use at least Samba 2.2 to ensure that PDC
functionality for Windows NT/2000/XP clients is present. Prior to
Samba 2.2, only limited user authentication for NT clients was
present.
In this section, we will show you how to configure Samba as a PDC for
use with Windows 95/98/Me and Windows NT/2000/XP clients. The two
groups of Windows versions interact differently within domains, and
in some cases are supported in slightly different ways. If you know
you are going to be using only Windows 95/98/Me or Windows
NT/2000/XP, you can set up Samba to support only that group. However,
there isn't any harm in supporting both at the same
time.
TIP
If you would like more information on how to set up
domains, see the file
Samba-PDC-HOWTO.html
in the docs/htmldocs directory of the Samba
source distribution.
Samba must be the only domain controller for the domain. Make sure
that a PDC isn't already active, and that there are
no backup domain controllers. Samba 2.2 is not able to communicate
with backup domain controllers, and having domain controllers in your
domain with unsynchronized data would result in a very dysfunctional
network.
TIP
Although Samba 2.2 cannot function as, or work with, a Windows NT
BDC, it is possible to set up
another Samba server to act as a backup for a Samba PDC. For further
information, see the file
Samba-BDC-HOWTO.html
in the docs/htmldocs directory of the Samba
source distribution.
Configuring Samba to be a PDC is a matter of modifying the
smb.conf file, creating some directories, and
restarting the server.
Modifying smb.conf
First you will need to start with an
smb.conf file that correctly configures Samba for
workgroup computing, such as the one we created in Chapter 2, and insert the following lines into the
[global] section:
[global]
    ; use the name of your Samba server instead of toltec
    ; and your own workgroup instead of METRAN
    netbios name = toltec
    workgroup = METRAN
    encrypt passwords = yes

    domain master = yes
    local master = yes
    preferred master = yes
    os level = 65

    security = user
    domain logons = yes

    ; logon path tells Samba where to put Windows NT/2000/XP roaming profiles
    logon path = \\%L\profiles\%u\%m
    logon script = logon.bat

    logon drive = H:
    ; logon home is used to specify home directory and
    ; Windows 95/98/Me roaming profile location
    logon home = \\%L\%u\.win_profile\%m

    time server = yes

    ; instead of jay, use the names of all users in the Windows NT/2000/XP
    ; Administrators group who log on to the domain
    domain admin group = root jay

    ; the below works on Red Hat Linux - other OSs might need a different command
    add user script = /usr/sbin/useradd -d /dev/null -g 100 -s /bin/false -M %u
And after the [global] section, add these three
new shares:
[netlogon]
    path = /usr/local/samba/lib/netlogon
    writable = no
    browsable = no

[profiles]
    ; you might wish to use a different directory for your
    ; Windows NT/2000/XP roaming profiles
    path = /home/samba-ntprof
    browsable = no
    writable = yes
    create mask = 0600
    directory mask = 0700

[homes]
    read only = no
    browsable = no
    guest ok = no
    map archive = yes
Now for the explanation. If you are comparing this example to the
configuration file presented in Chapter 2, you
will notice that the first three parameter settings are similar. We
start out in the [global] section by setting the
NetBIOS name of the Samba server. We are using the default, which is
the DNS hostname, but are being explicit because the NetBIOS name is
used in UNCs that appear later in smb.conf. The
next two lines, setting the workgroup name and choosing to use
encrypted passwords, are identical to our
smb.conf file from Chapter 2.
However, things are now a little different: even though it still
reads "workgroup", we are actually
setting the name of the domain. For a workgroup, using encrypted
passwords is optional; when using a domain, they are required.
The next four lines set up our Samba PDC to handle browsing services.
The line domain master
= yes causes Samba to be the
domain master browser, which handles browsing services for the domain
across multiple subnets if necessary. Although it looks very similar,
local master
= yes does not cause Samba to
be the master browser on the subnet, but merely tells it to
participate in browser elections and allow itself to win. (These two
lines are yet more default settings that we include to be clear.) The
next two lines ensure that Samba wins the elections. Setting the
preferred master parameter
makes Samba force an election when it starts up. The
os level parameter is set
higher than that of any other system, which results in Samba winning
that election. (At the time of this writing, an os
level of 65 was sufficient to win over all versions of
Windows—but make sure no other Samba server is set higher!) We
make sure Samba is both the domain and local master browser
because Windows NT/2000 PDCs always reserve the domain master browser
role for themselves and because Windows clients require things to be
that way to find the primary domain controller. It is possible to
allow another computer on the network to win the role of local master
browser, but having the same server act as both domain and local
masters is simpler and more efficient.
The next two lines in the [global] section set up
Samba to handle the actual domain logons. We set
security =
user so that Samba will require a username and
password. This is actually the same as in the workgroup setup we
covered in Chapter 1 and Chapter 2 because it is the default. The only
reason we're including it explicitly is to avoid
confusion: another valid setting is security
= domain, but that is for
having another (Windows or Samba) domain controller handle the logons
and should never be found in the smb.conf of a
Samba PDC. The next line, domain
logons =
yes, is what tells Samba we want this server to
handle domain logons.
Defining a logon path is necessary for supporting
roaming profiles for
Windows NT/2000/XP clients. The UNC
\\%L\profiles\%u refers to a share held on the
Samba server where the profiles are kept. The variables
%L and %u are replaced by Samba
with the name of the server and the username of the logged on user,
respectively. The section in smb.conf defining
the [profiles] share contains the definition of
exactly where the profiles are kept on the server.
We'll get back to this topic a bit later in this
chapter.
The logon script
= logon.bat line specifies the
name of an MS-DOS batch file that will be executed when the client
logs on to the domain. The path specified here is relative to the
[netlogon] share that is defined later in the
smb.conf file.
The settings of logon drive and
logon home have a couple of
purposes. Setting logon drive
= H: allows the home directory
of the user to be connected to drive letter H on the client. The
logon home parameter is set to
the location of the home directory on the server, and again,
%u is replaced at runtime by the logged on
user's username. The home directory is used to store
roaming profiles for Windows 95/98/Me clients. These parameters tie
into the [homes] share that we are adding, as we
will explain a bit later.
Setting time server
= yes causes Samba to advertise
itself as a time service for the network. This is
optional.
The domain admin
group parameter exists as a short-term measure in
Samba 2.2 to give Samba a list of users who have administrative
privileges in the domain. The list should contain any Samba users who
log on from Windows NT/2000/XP systems and are members of the
Administrators or Domain Admins groups, if roaming profiles are to
work correctly.
The last parameter to add to the [global] section
is add user
script, and you will need it only if one or more
of your clients is a Windows NT/2000/XP system. We will tell you more
about this in Section 4.2 later in this chapter.
The rest of the additions to smb.conf are the
definitions for three shares. The
[netlogon] share is necessary for Samba to
handle domain logons because Windows clients need to connect to it
during the logon process and will fail if the share does not exist.
Other than that, the only function of [netlogon]
is to be a repository for logon scripts and system-policy files,
which we shall cover in detail later in this chapter. The path to a
directory on the Samba server is given, and because the clients only
read logon scripts and system-policy files from the share, the
writable =
no definition is used to make the share read-only.
Users do not need to see the share, so we set
browsable =
no to make the share invisible.
The [profiles] share is needed for use with
Windows NT/2000/XP roaming profiles. The path points to a directory
on the Samba server where the profiles are kept, and in this case,
the clients must be able to read and write the profile data. The
create mask (read and write
permitted for the owner only) and directory
mask (read, write, and search permitted for the
owner only) are set up such that a user's profile
data can be read and written only by the user and not accessed or
modified by anyone else.
The [homes] share is necessary for our
definitions of logon drive and
logon home to work. Samba uses
the [homes] share to add the home directory of the
user (found in /etc/passwd ) as a share. Instead
of appearing as "homes", the share
will be accessible on the client through a folder having the same
name as the user's username. We will cover this
topic in more detail in Chapter 9.
At this point, you might want to run
testparm to check your
smb.conf file.
Creating Directories on the Samba Server
The
[netlogon] and [profiles]
shares defined in our new smb.conf file
reference directories on the Samba server, and it is necessary to
create those directories with the proper permissions:
# mkdir /usr/local/samba/lib/netlogon
# chmod 775 /usr/local/samba/lib/netlogon
# mkdir /home/samba-ntprof
# chmod 777 /home/samba-ntprof
The directory names we use are just examples. You are free to choose
your own.
Restarting the Samba Server
At this
point, the only thing left to do is restart the Samba server, and the
changes will be put into effect:
# /etc/rc.d/init.d/smb restart
(or use whatever method works on your system, as discussed in Chapter 2.) The server is now ready to accept domain
logons.
Adding Computer Accounts
To interact in a domain, a Windows NT/2000/XP system must be a member
of the domain. Domain membership is implemented
using computer
accounts, which are similar to user
accounts and allow a domain controller to keep information with which
to authenticate computers on the network. That is, the domain
controller must be able to tell if requests that arrive from a
computer are coming from a computer that it
"knows" as being part of the
domain. Each Windows NT/2000/XP system in the domain has a computer
account in the domain controllers' database, which
on a Windows NT/2000 hosted domain is the SAM
database. Although Samba uses a different method (involving the
smbpasswd file), it also treats computer accounts
similarly to user accounts.
To create a computer account, an administrator configures a Windows
NT/2000/XP system to be part of the domain. For Samba 2.2, the
"domain
administrator" is the root account on the Samba
server, and you will need to run the command:
# smbpasswd -a root
to add the root user to Samba's password database.
In this case, do not provide smbpasswd with the
same password as the actual root account on the server. Create a
different password to be used solely for creating computer accounts.
This will reduce the possibility of compromising the root password.
When the computer account is created, two things must happen on the
Samba server. An entry is added to the smbpasswd
file, with a "username" that is the
NetBIOS name of the computer with a dollar sign
($) appended to it. This part is handled by the
smbpasswd command, and you do not need to
perform any additional action to implement it.
With Samba 2.2, an entry is also required in the
/etc/passwd file[2] to give the computer account a
user ID (UID) on the Samba server.
This account will never be used to
log in to the Unix system, so it should not be given a valid home
directory or login shell. To make this part work, you must set the
add user
script parameter in your Samba configuration file,
using a command that adds the entry in the proper manner. On our Red
Hat Linux system, we set add
user script to:
/usr/sbin/useradd -d /dev/null -g 100 -s /bin/false -M %u
This command adds an entry in /etc/passwd
similar to the following:
aztec$:x:505:100::/dev/null:/bin/false
Again, notice that the username ends in a dollar sign. The user
account shown has a "home
directory" of /dev/null, a
group ID (GID) of 100, and a "login
shell" of /bin/false. The
-M flag in our useradd
command prevents it from creating the home directory. Samba replaces
the %u variable in the
useradd command with the NetBIOS name of the
computer, including the trailing dollar sign. The basic idea here is
to create an entry with a valid username and UID. These are the only
parts that Samba uses. It is important that the UID be unique, not
also used for other accounts—especially ones that are
associated with Samba users.
If you are using some other variety of Unix, you will need to replace
our useradd command with a command that performs
the same function on your system. If a command such as
useradd does not come with your system, you can
write a shell script yourself that performs the same function. In any
case, the command should add a password hash that does not correspond
to any valid password. For example, in the
/etc/shadow file of our Linux server, we find the
following two lines:
jay:%1%zQ7j7ok8$D/IubyRAY5ovM3bTrpUCn1:11566:0:99999:7:::
zapotec$:!!:11625:0:99999:7:::
The first line is for jay's user
account. The second field is the password hash—the long string
between the first and second colons. The second line is for the
computer account of zapotec, a domain member
server. Its "username" ends with a
dollar sign ($), and the second field in this case
has been set to "!!", which is an
arbitrary string not produced from any password. Therefore, there is
no valid password for this account on the Linux host. Just about any
ASCII string can be used instead of
"!!". For example, you could use
"DISABLED" instead.
TIP
It is possible to create the entries for
/etc/passwd and smbpasswd
manually; however, we suggest this method be used very carefully, and
only for initial testing, or as a last resort. The reason for this is
to maintain security. After the computer account has been created on
the server, the next Windows NT/2000/XP system on the network with a
matching NetBIOS name to log on to the domain will be associated with
this account. This allows crackers a window of opportunity to take
over computer accounts for their own purposes.
Configuring Windows Clients for Domain Logons
The client-side configuration for Windows
clients is really simple. All you have to do is switch from workgroup
to domain networking by enabling domain logons, and in the case of
Windows NT/2000/XP, also provide the root password you gave
smbpasswd for creating computer accounts. This
results in the Windows NT/2000/XP system becoming a member of the
domain.
Windows 95/98/Me
To
enable domain logons with Windows 95/98/Me, open the Control Panel
and double-click the Network icon. Then click Client for Microsoft
Networks, and click the Properties button. At this point, you should
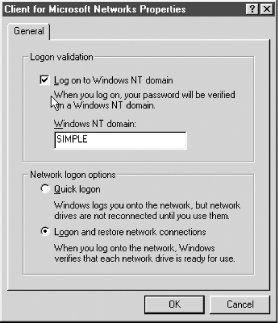
see a dialog box similar to Figure 4-1. Select the
Logon to Windows Domain checkbox at the top of the dialog box, and
enter the name of the domain as you have defined it with the
workgroup parameter in the Samba configuration
file. Then click OK, and reboot the machine when asked.
Figure 4-1. Configuring a Windows 95/98 client for domain logons
WARNING
If Windows complains that you are already
logged into the domain, you probably have an active connection to a
share in the workgroup (such as a mapped network drive). Simply
disconnect the resource temporarily by right-clicking its icon and
choosing the Disconnect pop-up menu item.
When Windows reboots, you should see the standard logon dialog with
an addition: a field for a domain. The domain name should already be
filled in, so simply enter your password and click the OK button. At
this point, Windows should consult the primary domain controller
(Samba) to see if the password is correct. (You can check the log
files if you want to see this in action.) If it worked,
congratulations! You have properly configured Samba to act as a
domain controller for Windows 95/98/Me machines, and your client is
successfully connected.
User-Level Security for Windows 95/98/Me
Now that you have a primary domain
controller to authenticate users, you can implement much better
security for shares that reside on Windows 95/98/Me
systems.[3] To enable this functionality, open the
Control Panel, double-click the Network icon, and click the Access
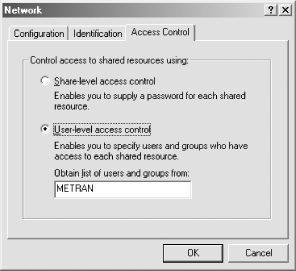
Control tab in the dialog box. The window should now look like Figure 4-2.
Figure 4-2. Setting user-level access control
Click the User-level access control radio button, and type in the
name of your domain in the text area. Click the OK button. If you get
the dialog box shown in Figure 4-3, it means that
shares are already on the system.
Figure 4-3. Error dialog while changing to user-level access control
In that case, you might want to cancel the operation and make a
record of each of the computer's shares, making it
easier to re-create them, and then redo this part. (To get a list of
shares, open an MS-DOS prompt window and run the
net view
\\computer_name
command.) Otherwise, you will get a message asking you to reboot to
put the change in configuration into effect.
After rebooting, you can create shares with user-level access
control. To do this, right-click the folder you wish to share, and
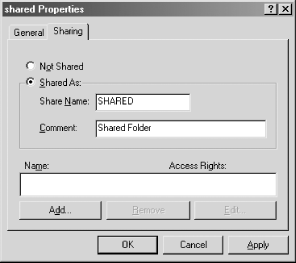
select Sharing.... This will bring up the Shared Properties dialog
box, shown in Figure 4-4.
Figure 4-4. The Shared Properties dialog
Click the Shared As: radio button, and give the share a name and
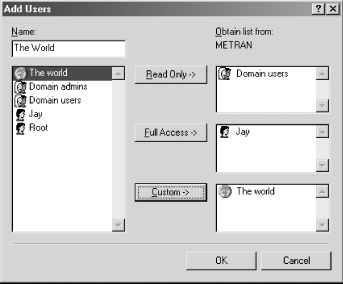
comment. Then click the Add... button, and you will see the Add Users
dialog box, shown in Figure 4-5.
Figure 4-5. The Add Users dialog
What has happened is that Windows has contacted the primary domain
controller (in this case, Samba) and requested a list of domain users
and groups. You can now select a user or group and add it to one or
more of the three lists on the righthand side of the window—for
Read Only, Full Access, or Custom Control—by clicking the
buttons in the middle of the window. When you are done, click the OK
button. If you added any users or groups to the Custom Control list,
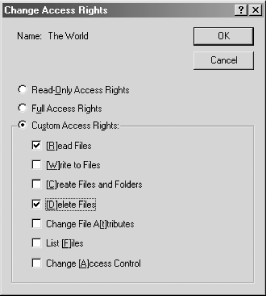
you will be presented with the Change Access Rights dialog box, shown
in Figure 4-6, in which you can specify the rights
you wish to allow. Then click the OK button to close the dialog box.
Figure 4-6. The Change Access Rights dialog
You are now returned to the Shared Properties dialog box, where you
will see the Name: and Access Rights: columns filled in with the
permissions that you just created. Click the OK button to finalize
the process. Remember, you will have to perform these actions on any
folders that you had previously shared using share-level security.
Windows NT 4.0
To
configure Windows NT for domain logons, log in to the computer as
Administrator or another user in the Administrators group, open the
Control Panel, and double-click the Network icon. If it
isn't already selected, click on the Network
Identification tab.
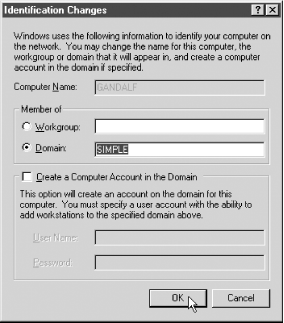
Click the Change... button, and you should see the dialog box shown
in Figure 4-7. In this dialog box, you can choose
to have the Windows NT client become a member of the domain by
clicking the checkbox marked Domain: in the Member of box. Then type
in the name of the domain to which you wish the client to log on; it
should be the same as the one you specified using the
workgroup parameter in the Samba configuration
file. Click the checkbox marked Create a Computer Account in the
Domain, and fill in "root" for the
text area labeled User Name:. In the Password: text area, fill in the
root password you gave smbpasswd for creating
computer accounts.
Figure 4-7. Configuring a Windows NT client for domain logons
WARNING
If Windows complains that you are already logged in, you probably
have an active connection to a share in the workgroup (such as a
mapped network drive). Disconnect the resource temporarily by
right-clicking its icon and choosing the Disconnect pop-up menu item.
After you press the OK button, Windows should present you with a
small dialog box welcoming you to the domain. Click the Close button
in the Network dialog box, and reboot the computer as requested. When
the system comes up again, the machine will automatically present you
with a logon screen similar to the one for Windows 95/98/Me clients,
except that the domain text area has a drop-down menu so that you can
opt to log on to either the local system or the domain. Make sure
your domain is selected, and log on to the domain using any
Samba-enabled user account on the Samba server.
WARNING
Be sure to select the correct domain in the Windows NT logon dialog
box. Once it is selected, it might take a moment for Windows NT to
build the list of available domains.
After you enter the password, Windows NT should consult the primary
domain controller (Samba) to see if the password is correct. Again,
you can check the log files if you want to see this in action. If it
worked, you have successfully configured Samba to act as a domain
controller for Windows NT machines.
Windows 2000
To
configure Windows 2000 for domain logons, log in to the computer as
Administrator or another user in the Administrators group, open the
Control Panel, and double-click the System icon to open the System
Properties dialog box. Click the Network Identification tab, and then
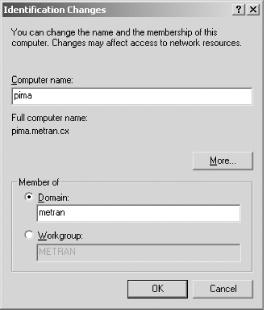
click the Properties button. You should now see the Identification
Changes dialog box shown in Figure 4-8.
Figure 4-8. The Identification Changes dialog
Click the radio button labeled
"Domain:" and fill in the name of
your domain in the text-entry area. Then click the OK button. This
will bring up the Domain Username and Password dialog box. Enter
"root" for the username. For the
password, use the password that you gave to
smbpasswd for the root account.
WARNING
If Windows complains that you are already logged in, you probably
have an active connection to a share in the workgroup (such as a
mapped network drive). Disconnect the resource temporarily by
right-clicking its icon and choosing the Disconnect pop-up menu item.
After you press the OK button, Windows should present you with a
small dialog box welcoming you to the domain. When you click the OK
button in this dialog box, you will be told that you need to reboot
the computer. Click the OK button in the System Properties dialog
box, and reboot the computer as requested. When the system comes up
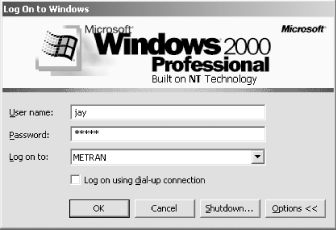
again, the machine will automatically present you with a Log On to
Windows dialog box similar to the one shown in Figure 4-9.
Figure 4-9. The Windows 2000 logon window
If you do not see the Log on to: drop-down menu, click the Options
<< button and it will appear. Select your domain, rather than
the local computer, from the menu.
WARNING
Be sure to select the correct domain in the logon dialog box. Once it
is selected, it might take a moment for Windows to build the list of
available domains.
Enter the username and password of any Samba-enabled user in the User
name: and Password: fields, and either press the Enter key or click
the OK button. If it worked, your Windows session will start up with
no error dialogs.
Windows XP Home
You have our
condolences if you are trying to use the Home edition of Windows XP
in a domain environment! Microsoft has omitted support for Windows NT
domains from Windows XP Home, resulting in a product that is
ill-suited for use in a domain-based network.
On the client side, Windows XP Home users cannot log on to a Windows
NT domain. Although it is still possible to access domain resources,
a username and password must be supplied each time the user connects
to a resource, rather than the "single
signon" of a domain logon. Domain features such as
logon scripts and roaming profiles are not supported.
As a server, Windows XP Home cannot join a Windows NT domain as a
domain member server. It can serve files and printers, but only using
share-mode ("workgroup") security.
It can't even use user-mode security, as Windows
95/98/Me can.
Considering these limitations, we do not recommend Windows XP Home
for any kind of local area network computing.
Windows XP Professional
To configure Windows XP
Professional for domain logons, log in to the computer as
Administrator or another user in the Administrators group, open the
Control Panel in Classic View, and double-click the System icon to
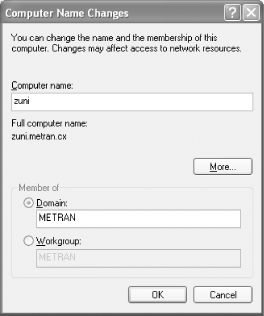
open the System Properties dialog box. Click the Computer Name tab
and then click the Change... button. You should now see the Computer
Name Changes dialog box shown in Figure 4-10.
Figure 4-10. The Computer Name Changes dialog
Click the radio button labeled
"Domain:", and fill in the name of
your domain in the text-entry area. Then click the OK button. This
will bring up the Domain Username and Password dialog box. Enter
"root" for the username. For the
password, use the password that you gave to
smbpasswd for the root account.
WARNING
If Windows complains that you are already logged in, you probably
have an active connection to a share in the workgroup (such as a
mapped network drive). Disconnect the resource temporarily by
right-clicking its icon and choosing the Disconnect pop-up menu item.
After you press the OK button, Windows should present you with a
small dialog box welcoming you to the domain. When you click the OK
button in this dialog box, you will be told that you need to reboot
the computer to put the changes into effect. Click the OK buttons in
the dialog boxes to close them, and reboot the computer as requested.
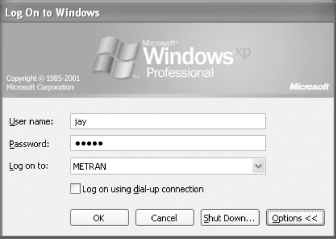
When the system comes up again, the machine will automatically
present you with a Log On to Windows dialog box similar to the one
shown in Figure 4-11.
Figure 4-11. The Windows XP logon window
If you get a dialog box at this point that tells you the domain
controller cannot be found, the solution is to change a registry
setting as follows.
Open the Start Menu and click the Run... menu item. In the text area
in the dialog box that opens, type in
"regedit" and click the OK button
to start the Registry Editor. You will be editing the registry, so
follow the rest of the directions very carefully. Click the
"+" button next
to the HKEY_LOCAL_MACHINE folder, and in the contents that open up,
click the "+"
button next to the SYSTEM folder. Continue in the same manner to open
CurrentControlSet, then Services, then Netlogon. (You will have to
scroll down many times to find Netlogon in the list of services.)
Then click the Parameters folder, and you will see items appear in
the right side of the window. Double-click
"requiresignorseal", and a dialog
box will open. In the Value data: text area, change the
"1" to a
"0" (zero), and click the OK
button, which modifies the registry both in memory and on disk. Now
close the Registry Editor and log off and back on again.
If you do not see the Log on to: drop-down menu, click the Options
<< button and it will appear. Select your domain from the menu,
rather than the local computer.
WARNING
Be sure to select the correct domain in the logon dialog box. Once it
is selected, it might take a moment for Windows to build the list of
available domains.
Enter the username and password of any Samba-enabled user in the User
name: and Password: fields, and either press the Enter key or click
the OK button. If it worked, your Windows session will start up with
no error dialogs.
Logon Scripts
After a Windows client connects with a
domain controller (either to authenticate a user, in the case of
Windows 95/98/Me, or to log on to the domain, in the case of Windows
NT/2000/XP), the client downloads an MS-DOS batch file to run. The
domain controller supplies the file assuming one has been made
available for it. This batch file is the logon script and is useful
in setting up an initial environment for the user.
In a Unix environment, the ability to run such a script might lead to
a very complex initialization and deep customization. However, the
Windows environment is mainly oriented to the GUI, and the
command-line functions are more limited. Most commonly, the logon
script is used to run a net command, such as
net use, to connect a network drive letter,
like this:
net use T: \\toltec\test
This command will make our [test] share (from
Chapter 2) show up as the T: drive in My Computer.
This will happen automatically, and T: will be available to the user
at the beginning of her session, instead of requiring her to run the
net use command or connect the T: drive using
the Map Network Drive function of Windows Explorer.
Another useful command is:
net use H: /home
which connects the
user's home directory to a drive letter (which can
be H:, as shown here, or some other letter, as defined by
logon drive). For this to work,
you must have a [homes] share defined in your
smb.conf file.
If you are using roaming profiles, you should definitely
have:
net time \\toltec /set /yes
in your logon script. (As usual, replace
"toltec" with the name of your
Samba PDC.) This will make sure the clocks of the Windows clients are
synchronized with the PDC, which is important for roaming profiles to
work correctly.
Creating a Logon Script
In our
smb.conf file, we have the line:
logon script = logon.bat
This defines the location and name of the logon script batch file on
the Samba server. The path is relative to the
[netlogon] share, defined later in the
file like this:
[netlogon]
    path = /usr/local/samba/lib/netlogon
    writable = no
    browsable = no
With this example, the logon script is
/user/local/samba/lib/netlogon/logon.bat. We
include the directives writable
= no, to make sure network
clients cannot change anything in the [netlogon]
share, and also browsable =
no, which keeps them from even seeing the share
when they browse the contents of the server. Nothing in
[netlogon] should ever be modified by
nonadministrative users. Also, the permissions on the directory for
[netlogon] should be set appropriately (no write
permissions for "other" users), as
we showed you earlier in this chapter.
Notice also that the extension of our logon script is
.bat. Be careful about this—an extension
of .cmd will work for Windows NT/2000/XP clients,
but will result in errors for Windows 95/98/Me clients, which do not
recognize .cmd as an extension for batch files.
Because the logon script will be executed on a Windows system, it
must be in MS-DOS text-file format, with the end of line composed of
a carriage return followed by a linefeed. The Unix convention is a
newline, which is simply a linefeed character, so if you use a Unix
text editor to create your logon script, you must somehow make it use
the appropriate characters. With
vim (a clone of the vi
editor that is distributed with Red Hat Linux), the method is to
create a new file and use the command:
:se ff=dos
to set the file format to MS-DOS style before typing in any text.
With emacs, the same can be done using the command:
^X Enter f dos Enter
where ^X is a Control-X character and
Enter is a press of the Enter key. Another method
is to create a Unix-format file in any text editor and then convert
it to MS-DOS format using the
unix2dos program:
$ unix2dos unix_file >logon.bat
If your system does not have unix2dos,
don't worry. You can implement it yourself with the
following two-line Perl script:
#!/usr/bin/perl
open FILE, $ARGV[0];
while (<FILE>) { s/$/\r/; print }
Or, you can use Notepad on a Windows system to write your script and
then drag the logon script over to a folder on the Samba server. In
any case, you can check the format of your script using
the od command, like this:
$ od -c logon.bat
You should see output resembling this:
0000000   n  e  t     u  s  e      T   :    \  \  t  o  l
0000020   t  e  c  \  t  e  s  t  \r  \n
0000032
The important detail here is that at the end of each line is a
\r \n, which is a carriage
return followed by a linefeed.
Our example logon script, containing a single net
use command, was created and set up in a way that allows
it to be run successfully on any Windows client, regardless of which
Windows version is installed on the client and which user is
authenticating or logging on to the domain. But what if we need to
have different users, computers, or Windows versions running
different logon scripts?
One method is to use variables inside the logon script that cause commands to be
conditionally executed. For details on how to do this, you can
consult a reference on batch-file programming for MS-DOS and Windows
NT command language. One such reference is Windows NT
System Administration, published by
O'Reilly.
Windows batch-command language is very limited in functionality.
Fortunately, Samba also supports a means by which customization can
be handled. The
smb.conf file contains variables that can be
used to insert (at runtime) the name of the server
(%L), the username of the person who is
accessing the server's resources
(%u), or the computer name of the client
system (%m). To give an example, if we set up the
path to the logon script as:
logon script = %u/logon.bat
we would then put a directory for each user in the
[netlogon] share, with each directory named the
same as the user's username, and in each directory
we would put a customized logon.bat file. Then
each user would have his own custom logon script. We will give you a
better example of how to do this kind of thing in the next section,
Section 4.5.
TIP
For more information on Samba configuration file variables, such as
the %L, %u, and
%m variables we just used, see Chapter 6 and Appendix B.
When modifying and testing your logon script, don't
just log off of your Windows session and log back on to make your
script run. Instead, restart (reboot) your system before logging back
on. Because Windows often keeps the [netlogon]
share open across logon sessions, the reboot ensures that Windows and
Samba have completely released and reconnected the
[netlogon] share, and the new version of the logon
script is being run while logging on.
More information regarding logon scripts can be found in the
O'Reilly book, Managing Windows NT
Logons.
Roaming Profiles
One benefit of the centralized
authentication of Windows NT domains is that a user
can log on from more than just one
computer. To help users feel more "at
home" when logged on at a computer other than their
usual one, Microsoft has added the ability for
users' personal settings to
"roam" from one computer to
another.
All Windows versions can be configured individually for each user of
the computer. Windows NT/2000/XP supports the ability to handle
multiple user accounts, and Windows 95/98/Me can be configured for
use by multiple users, keeping the configuration settings for each
user separate. Each user can configure the
computer's settings to her liking, and the system
saves these settings as the user's
profile, such that upon logging on to the
system, the user is presented with her familiar desktop.
Some of the settings, such as folder options or the image used for
the desktop background, are held in the registry. Others, including
the documents and folders appearing on the desktop and the contents
of the Start menu, are stored as folders and files in the filesystem.
When the profile is stored on the local system, it is called a
local profile. On Windows NT, local profiles are
stored in C:\winnt\profiles. On Windows 2000/XP,
they can be found in C:\Documents and Settings.
On Windows 95/98/Me, when configured for a single user
(the default case), the local profile is scattered in places such as
the registry and directories such as
C:\Windows\Desktop and
C:\Windows\Start Menu. When Windows 95/98/Me is
configured for multiple users, the local profile of the preexisting
user is moved to a folder in C:\Windows\Profiles
that has the same name as the user, and any users that are
subsequently added to the computer have their local profiles created
in that directory as well. You can browse through the local profiles
to see their structure—each has a registry file
(USER.DAT for Windows 95/98/Me and
NTUSER.DAT for Windows NT/2000/XP) and some folders
that contain shortcuts and documents.
A roaming profile is a user profile that is stored on a server and
"follows" its owner around the
network so that when the user logs on to the domain from another
computer, his profile is downloaded from the server and his familiar
desktop appears on that computer as well.
WARNING
Samba can
support roaming profiles, and it is a fairly simple matter to
configure it for them. However, this is one feature that we recommend
you do not use, at least until you are sure you
understand roaming profiles well and are very confident that you can
implement them with no harm incurred. If you want to (or are required
to) implement roaming profiles for your Windows clients, we suggest
you first set up a small domain with a Samba server and a few Windows
clients exclusively for the purposes of research and testing.
Under no circumstances should you attempt to implement
roaming profiles in a careless or frivolous manner.
How Roaming Profiles work
We will start out by explaining to you
how roaming profiles work when set up correctly. You will need a
clear understanding of them to tell the difference between when they
are working as they are designed and when they are not. In addition,
roaming profiles can be a source of confusion for your users in many
ways, and you should know how to detect when a problem with a client
is related to roaming profile function or dysfunction.
TIP
A definitive source of
documentation on Windows NT roaming profiles is the Microsoft white
paper Implementing Policies and Profiles for Windows NT
4.0, which can be found at
http://www.microsoft.com/ntserver/techresources/management/prof_policies.asp.
During the domain logon process, the roaming profile is copied from
the domain controller and used as a local profile during the
user's logon session. When the user logs off the
domain, the local profile is copied back to the domain controller and
stored as the new roaming profile. When the local profile is changed,
the server does not receive an update until the user logs off the
domain or shuts down or reboots the client. The client does not send
an update to the server during the logon session, and a client does
not receive an update of a setting changed on another client during a
logon session. When the user does log off, changes in the
configuration settings in the local profile are sent to the server,
and the updates of the roaming profile are available for the next
logon session.
This simple behavior can lead to unexpected results when users are
logged on to the domain
on more than one client at a time. If a user makes a change to the
configuration settings on one client and then logs off, the settings
can result in the roaming profile being modified accordingly. But the
next client that logs off might cause those changes to be
overwritten, and if so, the settings from the first client will be
lost. The behavior of different Windows versions varies with regard
to this, and we've seen a wide variety of
behaviors—not always in alignment with
Microsoft's documentation or even working the same
way on separate occasions. Sometimes Windows will refuse to overwrite
a profile, perhaps giving an "access
denied" error, and at other times it will seem to
work while producing odd side effects. A common source of confusion
is what happens if a file is added to or deleted from the desktop,
which is by default configured to be part of the profile. A deleted
file might later reappear, and it is even possible for a file to
irrecoverably disappear without warning (on Windows 95/98). Or maybe
a file that is added to the desktop on one client never gets added to
the roaming profile and fails to propagate to other clients. This
behavior is somewhat improved on Windows 2000/XP, which attempts to
merge items into the profile that are added on concurrently logged-on
clients.
One factor that comes into play is that Windows compares the
timestamps of the local and roaming
profiles and can refuse to overwrite a roaming profile if it is newer
than the local profile on the client, or vice versa. For this reason,
it is important to keep the clocks of the Windows clients and the
Samba PDC synchronized. We have already shown you how to do this,
using the net time
\\server
/set /yes command in the
logon script.
Even when the server and clients are
correctly configured, a number of things that can happen make things
seem "broken." The most common
occurrence is that some shortcuts on clients other than the one that
created the roaming profile will not work. These shortcuts can exist
on the desktop or as items in the Start menu. This behavior is a
result of applications or files that exist on one computer but not
others. Windows will display these shortcuts, but if they appear on
the desktop, they will have a generic icon and will bring up an error
message if a user double-clicks them.
TIP
Because profiles can and usually do include the contents of the
desktop and other folders, it is possible for the roaming profile to
grow to a huge size due to actions of a user, such as creating new
files on the desktop or copying files there. By default, Internet
Explorer keeps its disk cache in the Temporary Internet
Files folder in the profile and has been
known to populate this directory with thousands of files. This can
result in a huge roaming profile that causes network congestion and
very large delays while users are logging on to the domain. (A fix
for this can be found in article Q185255 in the Microsoft Knowledge
Base.)
One behavior we've seen a few times is that if, for
some reason (e.g., a network error or misconfiguration), the roaming
profile is not available during the logon process, Windows will use
the local profile on the client instead. When this happens, the user
might receive an unfamiliar profile, and all the benefits of roaming
profiles are lost for that logon session.
Configuring Samba for Roaming Profiles
In an ideal world, different Windows
versions would share the same roaming profile, allowing users to log
on to the domain from any Windows client system, ranging from Windows
95 to Windows XP, and enjoy their familiar settings. It would even be
possible to be logged on concurrently from multiple clients, and a
change made to the profile on any of them would quickly propagate to
all the others. Settings in a roaming profile made on a client that
didn't apply to another would be handled sanely.
Unfortunately, this scenario does not work in reality, and it is
important to maintain separate roaming profiles to prevent different
Windows versions from using or modifying a roaming profile created
by, and/or in use by, another version.
We do this by using configuration file variables to point to
different profile directories. If you look at Table B-1 in Appendix B, which shows
the variables that can be used, you might be tempted to use the
%a variable, which
is replaced by the name of the operating system the client is
running. However, this does not work because all of Windows 95/98/Me
will be seen as the same operating system, and likewise for Windows
2000/XP. So, we use %m to get the
NetBIOS name of the client, and combine that with a symbolic link to
point to the directory containing the profile for the Windows version
that particular client is running.
Our additions to smb.conf that appeared earlier
in this chapter included the two lines:
logon path = \\%L\profiles\%u\%m
logon home = \\%L\%u\.win_profile\%m
The first line specifies where the roaming profiles for Windows
NT/2000/XP clients are kept, and the second line performs the same
function for Windows 95/98/Me clients. In both cases, the location is
specified as a UNC, but
logon path (for Windows
NT/2000/XP) is specified relative to the
[profiles] share, while
logon home (for Windows
95/98/Me) is specified relative to the user's home
directory. This is done to comply with Samba's
emulation of Windows NT/2000 PDC behavior.
The logon home UNC must begin
by specifying the user's home directory, which in
our previous example would be \\%L\%u. The
variable %L expands to the NetBIOS name of the
server (in this case, toltec), and
%u expands to the name of the user. This
must be done to allow the command:
C:\>net use h: /home
to function correctly to connect the user's home
directory to drive letter H: on all Windows clients. (The drive
letter used for this purpose is defined by logon
drive.) We add the directory
.win_profile to the UNC to put the Windows
95/98/Me roaming profile in a subdirectory of the
user's home directory.
WARNING
Note that in both logon path and logon
home, we absolutely avoid making the profile directory the
same as the user's home directory, and the directory
that contains the profile is not used for any other purpose. This is
because when the roaming profile is updated, all directories and
files in the roaming-profile directory that are not part of the
roaming profile are deleted.
In the logon path line in
smb.conf, we use %u to put
the profiles directory in a subdirectory in the
[profiles] share, such that each user gets her own
directory that holds her roaming profiles.
We define the [profiles] share like this:
[profiles]
    writable = yes
    create mask = 0600
    directory mask = 0700
    browsable = no
    path = /home/samba-ntprof
The first four parameters in the previous share definition specify to
allow roaming profiles to be written with the users'
permissions, to create files with read and write permissions for the
owner, and to create directories with read, write, and search
permissions for the owner and no access allowed for other users. As
with the [netlogon] share, we set
browsable =
no so that the share will not show up on the
clients in Windows Explorer.
We've decided to put our Windows NT/2000/XP profiles
in /home, the default location of the home
directories on Linux. This will make it simple to include the roaming
profiles in backups of the home directories. You can use another
directory if you like.
Notice that in both logon path
and logon home, the directory
we specify ends in %m, which Samba replaces with
the NetBIOS name of the client. We are using the
client's computer name to identify indirectly which
version of Windows it is running.
Initially, the directories you specify to hold the roaming profiles
will be empty and will become populated as clients log off for the
first time. (Samba will even create the directories if they do not
already exist.) At first, the directories will simply contain
profiles that are identical to the clients' local
profiles, and we highly recommend that you make a backup at this
point before things get complicated. A listing of the roaming profile
directory for user iman, after she has logged off
from Windows 98 clients mixtec and
pueblo and Windows Me clients
huastec and navajo, might look
something like the following:
$ ls -l /home/iman/.win_profile
total 4
drwx------    6 iman      iman          4096 Dec  8 18:09 huastec
drwx------    9 iman      iman          4096 Dec  7 03:47 mixtec
drwx------   11 iman      iman          4096 Dec  7 03:05 navajo
drwx------   11 iman      iman          4096 Dec  7 03:05 pueblo
If things were left like this, the clients would not share their
roaming profiles, so next we change from using separate directories
to having symbolic links point to common directories:
# mv mixtec Win98
# mv navajo WinMe
# rm huastec pueblo
# ln -s Win98 pueblo
# ln -s WinMe huastec
# chown iman:iman *
# ls -l /home/iman/.win_profile
total 6
lrwxrwxrwx    1 iman      iman             5 Nov 16 01:40 huastec -> WinMe
lrwxrwxrwx    1 iman      iman             5 Nov 16 01:40 mixtec -> Win98
lrwxrwxrwx    1 iman      iman             5 Nov 21 17:24 navajo -> WinMe
lrwxrwxrwx    1 iman      iman             5 Nov 23 01:16 pueblo -> Win98
drwx------    9 iman      iman          4096 Dec  7 03:47 Win98
drwx------   11 iman      iman          4096 Dec  7 03:05 WinMe
Now when iman logs on to the domain from either
Windows 98 system, the client from which she is logging on will get
the profile stored in the Win98 directory (that
started out as her local profile on mixtec). This
works likewise for the Windows Me clients.
To show a more complete example, here is a listing of a fully
operational Windows 95/98/Me profiles directory:
$ ls -l /home/jay/.win_profile
total 12
lrwxrwxrwx    1 jay      jay             9 Nov 16 22:14 aztec -> /home/jay
lrwxrwxrwx    1 jay      jay             5 Nov 16 01:40 hopi -> Win95
lrwxrwxrwx    1 jay      jay             5 Nov 16 01:40 huastec -> WinMe
lrwxrwxrwx    1 jay      jay             5 Nov 16 01:38 maya -> Win98
lrwxrwxrwx    1 jay      jay             5 Nov 16 01:40 mixtec -> Win98
lrwxrwxrwx    1 jay      jay             5 Nov 21 17:24 navajo -> WinMe
lrwxrwxrwx    1 jay      jay             5 Nov 23 01:16 pueblo -> Win98
lrwxrwxrwx    1 jay      jay             5 Nov 22 02:06 ute -> Win95
drwx------    6 jay      jay          4096 Dec  8 18:09 Win95
drwx------    9 jay      jay          4096 Dec  7 03:47 Win98
drwx------   11 jay      jay          4096 Dec  7 03:05 WinMe
lrwxrwxrwx    1 jay      jay             5 Nov 21 22:48 yaqui -> Win98
lrwxrwxrwx    1 jay      jay             9 Nov 16 22:14 zuni -> /home/jay
Again, the computer name of each client exists in this directory as a
symbolic link that points to the directory containing the actual
roaming profile. For example, maya, a client that
runs Windows 98, has a symbolic link named maya
to the Win98 directory. A listing of
Win98 shows:
$ ls -l Win98
total 148
drwxr-xr-x    3 jay      jay          4096 Nov 23 01:30 Application Data
drwxr-xr-x    2 jay      jay          4096 Nov 23 01:30 Cookies
drwxr-xr-x    3 jay      jay          4096 Dec  7 03:47 Desktop
drwxr-xr-x    3 jay      jay          4096 Nov 23 01:30 History
drwxr-xr-x    2 jay      jay          4096 Nov 23 01:30 NetHood
drwxr-xr-x    2 jay      jay          4096 Dec  7 03:47 Recent
drwxr-xr-x    3 jay      jay          4096 Nov 23 01:30 Start Menu
-rw-r--r--    1 jay      jay        114720 Dec  7 03:46 USER.DAT
The contents of the Win95 and
WinMe directories appear similar and contain
roaming profiles that work exactly as they should on their respective
operating systems.
Notice in the previous listing that aztec and
zuni are symbolic links to
/home/jay. We've cautioned you
never to configure a roaming profile directory to be a
user's home directory, but this is to handle
something different. The clients aztec and
zuni are Windows XP systems, which handle
logon home differently than
other versions of Windows. We have set logon
home =
\\%L\%u\.win
profile, and all versions of Windows except for
Windows XP strip off everything after \\%L\%u and
correctly locate the home directory—in this case,
/home/jay. Windows XP uses the full UNC, so we
simply add a symbolic link to redirect it to the correct directory to
get the net use H: /home command to work as it
should. The roaming profiles for Windows XP systems are not affected
by this and are kept with the other roaming profiles in the Windows
NT/2000/XP family, as shown in this listing:
$ ls -l /home/samba-ntprof/jay
total 16
lrwxrwxrwx    1 jay      jay             5 Nov 20 03:45 apache -> Win2K
lrwxrwxrwx    1 jay      jay             5 Nov 13 12:35 aztec -> WinXP
lrwxrwxrwx    1 jay      jay             5 Nov 13 12:34 dine -> WinNT
lrwxrwxrwx    1 jay      jay             5 Nov 24 03:44 inca -> Win2K
lrwxrwxrwx    1 jay      jay             5 Nov 13 12:34 pima -> Win2K
drwx------   13 jay      jay          4096 Dec  3 15:24 qero
drwx------   13 jay      jay          4096 Dec  1 20:31 Win2K
drwx------   12 jay      jay          4096 Nov 30 17:04 WinNT
drwx------   13 jay      jay          4096 Nov 20 01:23 WinXP
lrwxrwxrwx    1 jay      jay             5 Nov 20 06:09 yavapai -> WinXP
lrwxrwxrwx    1 jay      jay             5 Nov 13 12:34 zapotec -> Win2K
lrwxrwxrwx    1 jay      jay             5 Nov 13 12:35 zuni -> WinXP
As you can see, we are using a similar method for the Windows
NT/2000/XP roaming profiles. In the listing,
qero is not a symbolic link, but rather a
directory that holds the roaming profile for qero,
a Windows 2000 client that has recently been added. We had not
created a symbolic link called qero before
installing Windows 2000, so when jay logged off for the first time,
Samba created a directory named qero and copied
the roaming profile received from the client to the new directory.
Because this is a separate directory from Win2K,
which all other Windows 2000 clients are using to share their roaming
profiles, the roaming profile for qero works like
a local profile, except that it is stored on the primary domain
controller.
This might seem like an odd thing to do, but it has some purpose.
Sometimes you might wish to isolate a client in this manner,
especially while the operating system is being installed and
initially configured. Remember, if that client, with its default
local profile, is logged off the domain, the local profile will be
written to the roaming profile directory. If the client were using
the shared roaming profile directory, the effect could be
undesirable, to say the least. Using our method, the
qero directory can later be renamed to make it
into an archival backup, or it can just be deleted. Then a new
symlink named qero can be created to point to
the Win2K directory, and qero
will share the roaming profile in Win2K with the
other Windows 2000 clients.
An alternative method is simply to create the
symbolic
links before the clients are added to the network. After you become
more comfortable with the way roaming profiles work, you might find
this method to be simpler and quicker.
Again, we urge you to be careful about letting different versions of
Windows share the same roaming profile. The method of configuring
roaming profiles we've shown you here allows you to
test a configuration for a few clients at a time without affecting
your whole network of clients. For example, we could install a small
number of Windows 2000 and Windows XP systems in the domain for
testing purposes and then create symlinks for them that point to a
directory called Win2KXP to find out if sharing
roaming profiles between our Windows 2000 and Windows XP systems
meets our expectations. The Win2KXP directory
could be created as an empty directory, in which case it would have a
roaming profile written to it by the first of the clients to log off.
Or, Win2KXP could simply be a renamed roaming
profile directory that was created by one of the clients when it was
added to the domain.
Configuring Windows 95/98/Me for Roaming Profiles
For roaming profiles to work on
Windows 95/98/Me clients, all you need to do is change one setting to
allow each user to have a separate local profile. This has the side
effect of enabling roaming profiles as well.
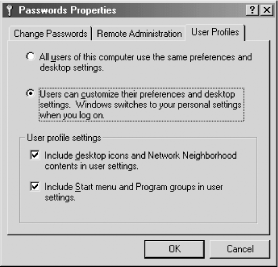
Open the Control Panel and double-click the Passwords icon to open
the Passwords Properties dialog box. Click the User Profiles tab, and
the dialog box will appear as shown in Figure 4-12.
Figure 4-12. The Windows 98 Passwords Properties dialog
Click the button labeled "Users can customize their
preferences and desktop settings." In the User
profile settings box, you can check the options you prefer. When
done, click the OK button and reboot as requested. During this first
reboot, Windows will copy the local profile data to
C:\windows\profiles but will not attempt to copy
the roaming profile from the server. The next time the system is shut
down, the local profile will be copied to the server, and when
Windows reboots, it will copy the roaming profile from the server.
Configuring Windows NT/2000/XP for Roaming Profiles
Roaming profiles are enabled by
default on Windows NT/2000/XP. In case you would like to check or
modify your settings, follow these directions.
Make sure you are logged in to the local system as Administrator or
another user in the Administrators group. Open the Control Panel and
double-click the System icon. On Windows NT/2000, click the User
Profiles tab, or on Windows XP, click the Advanced tab and then the
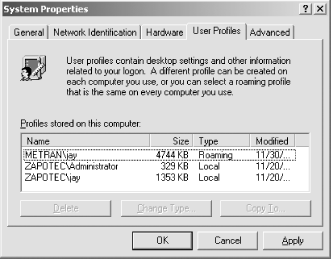
Settings button in the User Profiles box. You should see the dialog
box in Figure 4-13.
Figure 4-13. The Windows 2000 System Properties, User Profiles tab
Notice in the figure that there are two entries for the username
jay. The entry ZAPOTEC\jay refers to the account
on the local system, and METRAN\jay refers to the domain account.
Recall that when a user logs on, a drop-down menu in the dialog box
allows him to log on to a domain or log in to the local system. When
jay logs in to the local machine, only the local
profile is used. When logged on to the domain, the configuration
shown will use the roaming profile. To switch a
user's profile type for a domain logon account,
click the account name to select it, then click the Change Type...
button near the bottom of the dialog box. The Change Profile Type
dialog box will appear. Click the radio button for either roaming or
local profile, and then click the OK buttons for each dialog box.
Mandatory Profiles
With a simple
modification, a roaming profile can be made into a
mandatory
profile, which has the quality of being unmodifiable by its owner.
Mandatory profiles are used in some computing environments to
simplify administration. The theory is that if users cannot modify
their profiles, less can go wrong, and it is also possible to use the
same standardized profile for all users.
In practice, some issues come up. Because the users can still modify
the configuration settings in their local profile during their logon
session, confusion can result the next time they log on to the domain
and discover their changes have been
"lost." If the user of a client
reinstalls an application in a different place, the shortcuts to the
program on the desktop, in the Start menu, or in a Quick Launch bar
cannot be permanently deleted. They will reappear every time the user
logs back on to the domain. Essentially, a mandatory profile is a
roaming profile that always fails to update to the server upon
logging off!
Another complication is that different versions of Windows behave
differently with mandatory profiles. If a user who has a mandatory
profile creates a new file on her desktop, the file might be missing
the next time the user logs off and on again or reboots. Some Windows
versions preserve desktop files in the local profile (even if the
file does not exist in the mandatory profile), whereas others do not.
To change a roaming profile to a mandatory
profile, all you have to do is rename the
.dat file in the roaming profile directory
on the server to have a .man extension instead.
For a Windows 95/98/Me roaming profile, you would rename
USER.DAT to USER.MAN, and
for a Windows NT/2000/XP roaming profile, you would rename
NTUSER.DAT to NTUSER.MAN.
Also, you might want to make the roaming-profile directory and its
contents read-only, to make sure that a user can't
change it by logging into his Unix user account on the Samba host
system.
If you want to have all your users share a mandatory profile, you can
change the definitions of logon
path and logon
home in your smb.conf file to
point to a shared mandatory profile on the server and adjust your
directory structure and symbolic links accordingly. For example,
logon path and
logon home might be defined
like this:
logon path = \\%L\profiles\%m
logon home = \\%L\%u\.win_profile\%m
Notice that we've removed the %u
part of the path for logon
path, and we would also change the directory
structure on the server to do away with the separation of the
profiles by username and have just one profile for each Windows
NT/2000/XP version.
We cannot use the same treatment for logon
home because it is also used to specify the home
directory. In this case, we would change the symbolic links in each
user's .win_profile directory
to point to a common mandatory profile directory containing the
mandatory profiles for each of Windows 95/98/Me. Again, check the
ownership and permissions on the files in the directory, and modify
them if necessary to make sure a user can't modify
any files by logging into her Unix account on the Samba host system.
Logon Script and Roaming-Profile Options
Table 4-1 summarizes the options commonly used in
association with Windows NT domain logon
scripts and roaming profiles.
Table 4-1. Logon-script options
|
Option
|
Parameters
|
Function
|
Default
|
Scope
|
|
logon script
|
string (MS-DOS path)
|
Name of logon script batch file
|
None
|
Global
|
|
logon path
|
string (UNC server and share name)
|
Location of roaming profile
|
\\%N\%U\profile
|
Global
|
|
logon drive
|
string (drive letter)
|
Specifies the logon drive for a home directory
|
Z:
|
Global
|
|
logon home
|
string (UNC server and share name)
|
Specifies a location for home directories for clients logging on to
the domain
|
\\%N\%U
|
Global
|
logon script
This option specifies a Windows batch file that will be executed on
the client after a user has logged on to the domain. Each logon
script should be stored in the root directory of the
[netlogon] share or a subdirectory. This option
frequently uses the %U or %m
variables (user or NetBIOS name) to point to an individual script.
For example:
[global]
    logon script = %U.bat
will execute a script based on the username. If the user who is
connecting is fred and the path of the
[netlogon] share maps to the directory
/export/samba/netlogon, the script should be
/export/samba/netlogon/fred.bat. Because these
scripts are downloaded to the client and executed on the Windows
side, they must have MS-DOS-style newline characters rather than Unix
newlines.
logon path
This option specifies the location where roaming profiles are kept.
When the user logs on, a roaming profile will be downloaded from the
server to the client and used as the local profile during the logon
session. When the user logs off, the contents of the local profile
will be uploaded back to the server until the next time the user
connects.
It is often more secure to create a separate share exclusively for
storing user profiles:
[global]
    logon path = \\hydra\profile\%U
For more information on this option, see Section 4.5 earlier in this chapter.
logon drive
This option specifies the drive letter on a Windows NT/2000/XP client
to which the home directory specified with the
logon home option will be
mapped. Note that this option will work with Windows NT/2000/XP
clients only. For example:
[global]
    logon drive = I:
You should always use drive letters that will not conflict with fixed
drives on the client machine. The default is Z:, which is a good
choice because it is as far away from A:, C:, and D: as possible.
logon home
This option specifies the location of a user's home
directory for use by the MS-DOS net commands.
For example, to specify a home directory as a share on a Samba
server, use the following:
[global]
    logon home = \\hydra\%U
Note that this works nicely with the [homes]
service, although you can specify any directory you wish. Home
directories can be mapped with a logon script using the following
command:
C:\>net use i: /home
System Policies
A system policy can be used in a Windows
NT domain as a remote administration tool for implementing a similar
computing environment on all clients and limiting the abilities of
users to change configuration settings on their systems or allowing
them to run only a limited set of programs. One application of system
policies is to use them along with mandatory profiles to implement a
collection of computers for public use, such as in a library, school,
or Internet cafe.
A system policy is a collection of registry settings that is stored
in a file on the PDC and is automatically downloaded to the clients
when users log on to the domain. The file containing the settings is
created on a Windows system using the System Policy Editor. Because the format
of the registry is different between Windows 95/98/Me and Windows
NT/2000/XP, it is necessary to make sure that the file that is
created is in the proper format. This is a very simple matter because
when the System Policy Editor runs on Windows 95/98/Me, it will
create a file in the format for Windows 95/98/Me, and if it is run on
Windows NT/2000/XP, it will use the format needed by those versions.
After the policy file is created with the System Policy Editor, it is
stored on the primary domain controller and is automatically
downloaded by the clients during the logon process, and the policies
are applied to the client system.
On Windows NT 4.0 Server, you can run the System Policy Editor by
logging in to the system as Administrator or another user in the
Administrators group, opening the Start menu, and selecting Programs,
then Administrative Tools, then System Policy Editor. On Windows 2000
Advanced Server, open the Start menu and click Run . . . . In the
dialog box that comes up, type in
C:\winnt\poledit.exe, and click the OK button.
If you are using a Windows version other than NT Server or Windows
2000 Advanced Server, you must install the System Policy Editor, and
getting a copy of it can be a little tricky. If you are running
Windows NT 4.0 Workstation or Windows 2000 Professional and have a
Windows NT 4.0 Server installation CD-ROM, you can run the file
\Clients\Svrtools\Winnt\Setup.bat from that CD
to install the Client-based Network Administration Tools, which
includes poledit.exe. Then open the Start menu,
click Run..., type C:\winnt\system32\poledit.exe
into the text area, and click the OK button.
If you are using Windows 95/98, insert a Windows 95 or Windows 98
distribution CD-ROM[4] into your CD-ROM drive,
then open the Control Panel and double-click the Add/Remove Programs
button.
Click the Windows Setup tab, and then click the Have Disk...
button. In the new dialog box that appears, click the Browse...
button, then select the CD-ROM drive from the Drives drop-down menu.
Then:
-
If you are using a Windows 95 installation CD-ROM, double-click the
admin, then apptools, then poledit folder icons.
-
If you are using a Windows 98 installation CD-ROM, double-click the
tools, then reskit, then netadmin, then poledit folder icons.
You should see "grouppol.inf" appear in
the File name: text area on the left of the dialog box. Click the OK
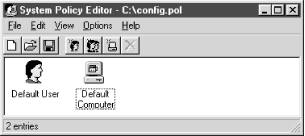
buttons in two dialog boxes, and you will be presented with a dialog
box in which you should select both the Group Policies and System
Policy Editor checkboxes. Then click the Install button. Close the
remaining dialog box, and you can now run the System Policy Editor by
opening the Start menu and selecting Programs, then Accessories, then
System Tools, then System Policy Editor. Or click the Run... item in
the Start Menu, and enter C:\Windows\Poledit.
When the System Policy Editor starts up, select New Policy from the
File menu, and you will see a window similar to that in Figure 4-14.
Figure 4-14. The System Policy Editor window
The next step is to make a selection from the File menu to add
policies for users, groups, and computers. For each item you add, you
will be asked for the username, or name of the group or computer, and
a new icon will appear in the window. Double-clicking one of the
icons will bring up the Properties dialog box, such as the one shown
in Figure 4-15.
Figure 4-15. The Properties dialog of System Policy Editor
The upper window in the dialog shows the registry settings that can
be modified as part of the system policy, and the lower window shows
descriptive information or more settings pertaining to the one
selected in the upper window. Notice in the figure that there are
three checkboxes and that they are all in different states:
- Checked
-
Meaning that the registry setting is enabled in the policy
- White (unchecked)
-
Which clears the registry setting
- Gray
-
Which causes the registry setting on the client to be unmodified
Basically, if all the items are left gray (the default), the system
policy will have no effect. The registry of the logged-on client will
not be modified. However, if any of the items are either checked or
unchecked (white), the registry on the client will be modified to
enable the setting or clear it.
WARNING
In this section, we are giving you enough information on using the
System Policy Editor to get you started—or, should we say,
enough rope with which to hang yourself. Remember that a system
policy, once put into action, will be modifying the registries of all
clients who log on to the domain. The usual warnings about editing a
Windows registry apply here with even greater importance. Consider
how difficult (or even impossible) it will be for you to restore the
registries on all those clients if anything happens to go wrong.
As with roaming profiles, casual or careless implementation
of system policies can easily lead to domain-wide
disaster.
Creating a good system policy file is a complex topic, which we
cannot cover in detail here. It would take a whole book, and yes,
there happens to be an O'Reilly book on the subject,
Windows System Policy Editor. Another
definitive source of documentation on Windows NT system policies and
the System Policy Editor is the Microsoft white paper
Implementing Policies and Profiles for Windows NT
4.0, which can be found at http://www.microsoft.com/ntserver/techresources/management/prof_policies.asp.
Once you have created a policy, click the OK button and use the Save
As... item from the File menu to save it. Use the filename
config.pol for a Windows 95/98 system policy and
ntconfig.pol for a policy that will be used on Windows
NT/2000/XP clients. Finally, copy the .pol file
to the directory used for the [netlogon] share on
the Samba PDC. The config.pol and
ntconfig.pol files must go in this
directory—unlike roaming profiles and logon scripts, there is
no way to specify the location of the system policy files in
smb.conf. If you want to have different system
policies for different users or computers, you must perform that part
of the configuration within the System Policy Editor.
TIP
If you have, or will have, any Windows Me clients on your network,
be careful. Microsoft has stated that Windows Me does not support
system policies. The odd thing about this is that it will download
the policy from a config.pol file on the PDC,
but there is no guarantee that the results will be what was intended.
Check the effect of your system policy carefully on your Windows Me
clients to make sure it is working how you want.
When a user logs on to the domain, her Windows client will download
the .pol file from the server, and the settings
in it (that is, the items either checked or cleared in the System
Policy Editor) will override the client's settings.
If things "should work" but
don't, try shutting down the Windows client and
restarting, rather than just logging off and on again. Windows
sometimes will hold the [netlogon] share open
across logon sessions, and this can prevent the client from getting
the updated .pol file from the server.
Samba as a Domain Member Server
Up to now,
we've focused on configuring and using Samba as the
primary domain controller. If you already have a domain controller on
your network, either a Windows NT/2000 Server system or a Samba PDC,
you can add a Samba server to the domain as a domain member server.
This involves setting up the Samba server to have a computer account
with the primary domain controller, in a similar way that Windows
NT/2000/XP clients can have computer accounts on a Samba PDC. When a
client accesses shares on the Samba domain member server, Samba will
pass off the authentication to the domain controller rather than
performing the task on the local system. If the PDC is a Windows
server, any number of Windows BDCs might exist that can handle the
authentication instead of the PDC.
The first step is to add the Samba server to the domain by creating a
computer account for it on the primary domain controller. You can do
this using the smbpasswd command, as follows:
# smbpasswd -j DOMAIN -r PDCNAME -Uadmin_acct%password
In this command, DOMAIN is replaced by the
name of the domain the Samba host is joining,
PDCNAME is replaced by the computer name
of the primary domain controller,
admin_acct is replaced by the username of
an administrative account on the domain controller (either
Administrator—or another user in the Administrators
group—on Windows NT/2000, and root on Samba), and
password is replaced with the password of
that user. To give a more concrete example, on our domain that has a
Windows NT 4 Server primary domain controller or a Windows 2000
Active Directory domain controller named SINAGUA,
the command would be:
# smbpasswd -j METRAN -r SINAGUA -UAdministrator%hup8ter
and if the PDC is a Samba system, we would use the command:
# smbpasswd -j METRAN -r toltec -Uroot%jwun83jb
where jwun83jb is the password for the root user
that is contained in the smbpasswd file, as we
explained earlier in this chapter.
If you did it right, smbpasswd will respond with
a message saying the domain has been joined. The security
identifier[5] returned to Samba from the PDC is kept in
the file /usr/local/samba/private/secrets.tdb.
The information in
secrets.tdb is security-sensitive, so make sure to
protect secrets.tdb in the same way you would
treat Samba's password file.
The next step is to modify the
smb.conf file. Assuming you are starting with a
valid smb.conf file that correctly configures
Samba to function in a workgroup, such as the one we used in Chapter 2, it is simply a matter of adding the following
three lines to the [global] section:
workgroup = METRAN
security = domain
password server = *
The first line establishes the name of the domain (even though it
says "workgroup"). Instead of
METRAN, use the name of the domain you are joining. Setting security
to "domain" causes Samba to hand
off authentication to a domain controller, and the
password server
= * line tells Samba to find
the domain controller for authentication (which could be the primary
domain controller or a backup domain controller) by querying the WINS
server or using broadcast packets if a WINS server is not available.
At this point, it would be prudent to run
testparm to check that your
smb.conf is free of errors. Then restart the
Samba daemons.
If the PDC is a Windows NT system, you can use Server Manager to
check that the Samba server has been added successfully. Open the
Start menu, then select Programs, then Administrative Tools (Common),
and then Server Manager. Server Manager starts up with a window that
looks like Figure 4-16.
Figure 4-16. The Windows NT Server Manager window
As you can see, we've added both
toltec and mixtec to a domain
for which the Windows NT 4.0 Server system,
sinagua, is the primary domain controller.
You can check your setup on Windows 2000 Advanced Server by opening
the Start menu and selecting Programs, then Administrative Tools,
then Active Directory Users and Computers. The window that opens up
will look like Figure 4-17.
Figure 4-17. The Windows 2000 Active Directory Users and Computers window
Click Computers in the left side of the window with the Tree tab. You
should see your Samba system listed in the right pane of the window.
Windows NT Domain Options
Table 4-2 shows the options that are commonly used
in association with Samba on a Windows NT domain.
Table 4-2. Windows NT domain options
|
Option
|
Parameters
|
Function
|
Default
|
Scope
|
|
domain logons
|
boolean
|
Indicates whether Windows domain logons are to be used
|
No
|
Global
|
|
domain master
|
boolean
|
For telling Samba to take the role of domain master browser
|
Auto
|
Global
|
|
add user script
|
string (command)
|
Script to run to add a user or computer account
|
None
|
Global
|
|
delete user script
|
string (command)
|
Script to run to delete a user or computer account
|
None
|
Global
|
|
domain admin group
|
string (list of users)
|
Users that are in the Domain Admins group
|
None
|
Global
|
|
domain guest group
|
string (list of users)
|
Users that are in the Domain Guests group
|
None
|
Global
|
|
password server
|
string (list of computers)
|
List of domain controllers used for authentication when Samba is
running as a domain member server
|
None
|
Global
|
|
machine password timeout
|
numeric (seconds)
|
Sets the renewal interval for NT domain machine passwords
|
604,800 (1 week )
|
Global
|
Here are detailed explanations of each Windows NT domain option listed
in Table 4-2.
domain logons
This option configures Samba to accept domain logons as a primary
domain controller. When a client successfully logs on to the domain,
Samba will return a special token to the client that allows the
client to access domain shares without consulting the PDC again for
authentication. Note that the Samba machine must employ user-level
security (security =
user) and must be the PDC for this option to
function. In addition, Windows machines will expect a
[netlogon] share to exist on the Samba server.
domain master
In a Windows network, a local master browser handles browsing within
a subnet. A Windows domain can be made up of a number of subnets,
each of which has its own local master browser. The primary domain
controller serves the function of domain master browser, collecting
the browse lists from the local master browser of each subnet. Each
local master browser queries the domain master browser and adds the
information about other subnets to their own browse lists. When Samba
is configured as a primary domain controller, it automatically sets
domain master
= yes, making itself the domain
master browser.
Because Windows NT PDCs always claim the role of domain master
browser, Samba should never be allowed to be domain master if there
is a Windows PDC in the domain.
add user script
There are two ways in which add
user script can be used. When
the Samba server is set up as a primary domain controller, it can be
assigned to a command that will run on the Samba server to add a
Windows NT/2000/XP computer account to Samba's
password database. When the user on the Windows system changes the
computer's settings to join a domain, he is asked
for the username and password of a user who has administrative rights
on the domain controller. Samba authenticates this user and then runs
the add user
script with root permissions.
When Samba is configured as a domain member server, the
add user
script can be assigned to a command to add a user
to the system. This allows Windows clients to add users that can
access shares on the Samba system without requiring an administrator
to create the account manually on the Samba host.
delete user script
There are times when users are automatically deleted from the domain,
and the delete user
script can be assigned to a command that removes a
user from the Samba host as a Windows server would do. However, you
might not want this to happen, because the Unix user might need the
account for reasons other than use with Samba. Therefore, we
recommend that you be very careful about using this option.
domain admin group
In a domain of Windows systems, it is possible for a server to get a
list of the members of the Domain Admins group from a domain
controller. Samba 2.2 does not have the ability to handle this, and
the domain admin
group parameter exists as a manual means of
informing Samba who is in the group. The list should contain root
(necessary for adding computer accounts) and any users on Windows
NT/2000/XP clients in the domain who are in the Domain Admins group.
These users must be recognized by the primary controller in order for
them to perform some administrative duties such as adding users to
the domain.
password server
In a Windows domain in which the domain controllers are a Windows
primary domain controller, along with any number of Windows backup
domain controllers, clients and domain member servers authenticate
users by querying either the PDC or any of the BDCs. When Samba is
configured as a domain member server, the password
server parameter allows some control over how
Samba finds a domain controller. Earlier versions of Samba could not
use the same method that Windows systems use, and it was necessary to
specify a list of systems to try. When you set
password server
= *, Samba 2.2 is able to find
the domain controller in the same manner that Windows does, which
helps to spread the requests over several backup domain controllers,
minimizing the possibility of them becoming overloaded with
authentication requests. We recommend that you use this method.
machine password timeout
The machine password
timeout global option sets a retention period for
Windows NT domain machine passwords. The default is currently set to
the same time period that Windows NT 4.0 uses: 604,800 seconds (one
week). Samba will periodically attempt to change the
machine account password, which is a password
used specifically by another server to report changes to it. This
option specifies the number of seconds that Samba should wait before
attempting to change that password. The timeout period can be changed
to a single day by specifying the following:
[global]
    machine password timeout = 86400
TIP
If you would like more information on how Windows NT uses domain
usernames and groups, we recommend Eric Pearce's
Windows NT in a Nutshell, published by
O'Reilly.
Footnotes
[1] When we include
Windows XP in discussions of Windows NT domains in this book, we are
referring to Windows XP Professional and not to the Home edition. The
reason for this is explained in the section on Windows XP later in
this chapter.
[2] The entry in
/etc/passwd might not be required in future
Samba versions.
[3] If you want to follow our example in this
section, and your network doesn't have any Windows
systems offering shares, see Chapter 5 for
directions on how to create one. Make sure you understand how to set
up shares before continuing with the directions presented
here!
[4] The version of the System Policy
Editor distributed with Windows 98 is an update of the version
shipped with Windows 95. Use the version from the Windows 98
distribution if you can.
[5] This security identifier (SID) is part of
an access token that allows the PDC to identify and authenticate the
client.

